Sunday, November 25, 2012
hexnet.org and the pyramid of hexagons
The hexnet.org web site recently found my blog posting on why a "pyramid" of hexagons is cubic and linked to it on Google+.
Here is a link to their explanation of the same fact.
Saturday, November 17, 2012
Blender model for the pyramid of hexagons
In my previous post I provided a visual explanation of why a pyramid of hexagons is cubic. I created the visuals for that post using Blender 2.64 and Python. For those interested in playing with the Blender model, I have uploaded it (with its embedded Python script) to this Google docs drive.

Bear in mind that this is my first foray into both Blender and Python. So it's unlikely to be "idiomatic" Python or an example of Blender best practices!
To reduce size, the model only contains various cameras and lights. These are contained in layers 0, 8, 9, 10, 18 and 19 as can be seen at the bottom of the 3D view:

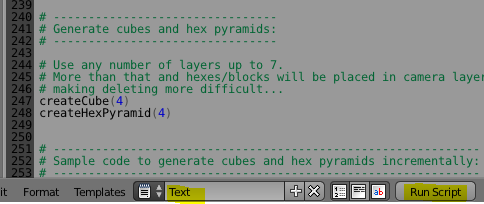
To create the blocks and hexagons you need to run the embedded script. First change from the "Default" layout to "Scripting" layout. Ensure the "Text" script is selected. And click on the "Run script" button.
Then change back to the default layout. You will see that layers 1 to 4 and 11 to 14 now show dots to indicate that they contain objects:

Layers 1 to 4 (the numbering starts at zero) in the top left block contain the various shells making up the cube. Layers 11 to 14 in the bottom left block contain the various layers making up the pyramid.
Since these two structures overlap, you shouldn't select both at the same time.
However when you want to start again, you should select just these 8 layers, hit A to toggle selection of all objects, and DELETE to delete the objects. Make sure you haven't selected any of the layers with cameras and lights, otherwise you will accidentally delete these too.
Use F12 to render the image as seen by the selected camera. But first you need to make sure that you have selected the layer that the camera and light are in, otherwise you will just see a silhouette.
Also make sure that the correct camera is selected for the scene...

However you can also generate just part of the structure. This gives more insight into how the cube can be constructed from the cornerstone outwards. For example, the following code generates the outermost ring of the outermost shell in a 4x4x4 cube:
And here is the code that does the same for the pyramid:


One quirk to note about the code...
I calculated the South-Western line of blocks to start from the orange block going to the yellow block (in fact, originally the orange block was coloured red). My thinking was to label each line from 0 to n-1, but ignore hex zero (since it is also hex n-1 of the previous line). It turned out that wasn't the best idea as far as hex colours go.
Instead of re-calculating the formulae for all the hexagons, I took a short-cut and simply remapped the colour of each hexagon as if it was the hexagon following it (in clockwise order)...
Here is the full Python script:
Anyway, that's it. Enjoy!
Bear in mind that this is my first foray into both Blender and Python. So it's unlikely to be "idiomatic" Python or an example of Blender best practices!
To reduce size, the model only contains various cameras and lights. These are contained in layers 0, 8, 9, 10, 18 and 19 as can be seen at the bottom of the 3D view:

To create the blocks and hexagons you need to run the embedded script. First change from the "Default" layout to "Scripting" layout. Ensure the "Text" script is selected. And click on the "Run script" button.
Then change back to the default layout. You will see that layers 1 to 4 and 11 to 14 now show dots to indicate that they contain objects:

Since these two structures overlap, you shouldn't select both at the same time.
However when you want to start again, you should select just these 8 layers, hit A to toggle selection of all objects, and DELETE to delete the objects. Make sure you haven't selected any of the layers with cameras and lights, otherwise you will accidentally delete these too.
Use F12 to render the image as seen by the selected camera. But first you need to make sure that you have selected the layer that the camera and light are in, otherwise you will just see a silhouette.
Also make sure that the correct camera is selected for the scene...
The Python script allows you to generate an entire cube or Pyramid of a particular size using the following lines of code at the end of the script:createCube(4) createHexPyramid(4)
However you can also generate just part of the structure. This gives more insight into how the cube can be constructed from the cornerstone outwards. For example, the following code generates the outermost ring of the outermost shell in a 4x4x4 cube:
createRingOfBlocks(4, 4, 4)

And here is the code that does the same for the pyramid:
createRingOfHexTiles(4, 4, 4, radius=1, thickness=1)
...or from another angle...

One quirk to note about the code...
I calculated the South-Western line of blocks to start from the orange block going to the yellow block (in fact, originally the orange block was coloured red). My thinking was to label each line from 0 to n-1, but ignore hex zero (since it is also hex n-1 of the previous line). It turned out that wasn't the best idea as far as hex colours go.
Instead of re-calculating the formulae for all the hexagons, I took a short-cut and simply remapped the colour of each hexagon as if it was the hexagon following it (in clockwise order)...
def getColorForBlockOrHex(layer, ring, direction, position):
# There is a better colour scheme than the one I chose.
# Luckily it is easy to change to it.
# Each hex/block uses the colour that the hex after it would have been assigned.
(direction, position) = getDirAndPosOfNextClockwiseBlockOrHex( direction, position, ring)
startColor = getStartColorForDirection(direction)
if ring == 1 or ring == 2:
(r, g, b) = startColor
else:
nextDir = getNextDir(direction)
endColor = getStartColorForDirection(nextDir)
(r1, g1, b1) = startColor
(r2, g2, b2) = endColor
ratio1 = (ring - position)/(ring-1)
ratio2 = (position - 1)/(ring-1)
r = ratio1 * r1 + ratio2 * r2
g = ratio1 * g1 + ratio2 * g2
b = ratio1 * b1 + ratio2 * b2
return (r,g,b)
Here is the full Python script:
import bpy
import math
from math import *
# From http://blenderscripting.blogspot.com/2011/05/blender-25-python-selecting-layer.html:
def selectLayer(layer):
return tuple(i == layer for i in range(0, 20))
# From http://wiki.blender.org/index.php/Dev:2.5/Py/Scripts/Cookbook/Code_snippets/Materials_and_textures:
def makeMaterial(name, diffuse, specular, alpha):
mat = bpy.data.materials.new(name)
mat.diffuse_color = diffuse
mat.diffuse_shader = 'LAMBERT'
mat.diffuse_intensity = 1.0
mat.specular_color = specular
mat.specular_shader = 'COOKTORR'
mat.specular_intensity = 0.5
mat.alpha = alpha
mat.ambient = 1
return mat
def setMaterial(ob, mat):
me = ob.data
me.materials.append(mat)
# ************************************************
# Following code by Andrew Tweddle, November 2012:
# ************************************************
# -----------------------------------
# Code common to blocks and hexagons:
# -----------------------------------
class Direction:
C = 0
SW = 1
W = 2
NW = 3
NE = 4
E = 5
SE = 6
def DirToString(direction):
if direction == Direction.C:
return "C"
elif direction == Direction.SW:
return "SW"
elif direction == Direction.W:
return "W"
elif direction == Direction.NW:
return "NW"
elif direction == Direction.NE:
return "NE"
elif direction == Direction.E:
return "E"
else:
return "SE"
def getNextDir(direction):
if direction == Direction.C:
return Direction.C
elif direction == Direction.SE:
return Direction.SW
else:
return direction + 1
def getDirAndPosOfNextClockwiseBlockOrHex(direction, position, ring):
if direction == Direction.C:
return (direction, position)
if position == ring - 1:
newDir = getNextDir(direction)
return (newDir, 1)
return (direction, position + 1)
def getStartColorForDirection(direction):
if direction == Direction.C:
return (1,1,1) # White
elif direction == Direction.SW:
return (1, 0, 0) # Red
elif direction == Direction.W:
return (1, 1, 0) # Yellow
elif direction == Direction.NW:
return (0, 1, 0) # Green
elif direction == Direction.NE:
return (0, 1, 1) # Cyan
elif direction == Direction.E:
return (0, 0, 1) # Blue
else: # direction == Direction.SE
return (1, 0, 1) # Magenta
def getColorForBlockOrHex(layer, ring, direction, position):
# There is a better colour scheme than the one I chose.
# Luckily it is easy to change to it.
# Each hex/block uses the colour that the hex after it would have been assigned.
(direction, position) = getDirAndPosOfNextClockwiseBlockOrHex( direction, position, ring)
startColor = getStartColorForDirection(direction)
if ring == 1 or ring == 2:
(r, g, b) = startColor
else:
nextDir = getNextDir(direction)
endColor = getStartColorForDirection(nextDir)
(r1, g1, b1) = startColor
(r2, g2, b2) = endColor
ratio1 = (ring - position)/(ring-1)
ratio2 = (position - 1)/(ring-1)
r = ratio1 * r1 + ratio2 * r2
g = ratio1 * g1 + ratio2 * g2
b = ratio1 * b1 + ratio2 * b2
return (r,g,b)
# ----------------------------------
# Code specific to blocks and cubes:
# -----------------------------------
def getBlockPositionInLastLayer(ring, direction, position):
if direction == Direction.C:
return (0,0,0)
elif direction == Direction.SW:
return (ring-1, ring-position-1,0)
elif direction == Direction.W:
return (ring-1, 0,position)
elif direction == Direction.NW:
return (ring-position-1, 0, ring-1)
elif direction == Direction.NE:
return (0, position,ring-1)
elif direction == Direction.E:
return (0, ring-1, ring-position-1)
else: # direction == Direction.SE
return (position, ring-1, 0)
def createBlock(layer, ring, direction, position, numberOfLayers):
(x,y,z) = getBlockPositionInLastLayer(ring, direction, position)
if layer < numberOfLayers:
offset = numberOfLayers-layer
(x,y,z) = (x+offset,y+offset,z+offset)
blockName = "Block_L" + str(layer) + "R" + str(ring) + DirToString(direction) + "_" + str(position)
blenderLayer = layer - ring + 1 # For bottom-up layering use: blenderLayer = layer
layerSelection = selectLayer(blenderLayer)
bpy.context.scene.layers[blenderLayer] = True # Otherwise bpy.context.object is not the newly added cube!
bpy.ops.mesh.primitive_cube_add(location=(x, y, z), layers=layerSelection)
bpy.context.object.name = blockName
bpy.context.object.dimensions = (0.995,0.995,0.995)
# Note: Made it slightly smaller to create shadows between adjacent blocks of the same colour
#
# Create a material for the new block:
diffuseColor = getColorForBlockOrHex(layer, ring, direction, position)
matName = "Mat_" + blockName
mat = makeMaterial(name = matName, diffuse = diffuseColor, specular=(1,1,1), alpha=1)
setMaterial(bpy.context.object, mat)
def createLineInRingOfBlocks(layer, ring, direction, numberOfLayers):
for pos in range(1,ring):
createBlock(layer, ring, direction, pos, numberOfLayers)
def createRingOfBlocks(layer, ring, numberOfLayers):
if ring == 1:
createBlock(layer, 1, Direction.C, 1, numberOfLayers)
else:
for dir in range(1,7):
createLineInRingOfBlocks(layer, ring, dir, numberOfLayers)
def createLayerOfBlocks(layer, numberOfLayers):
for ring in range(1,layer+1):
createRingOfBlocks(layer, ring, numberOfLayers)
def createCube(numberOfLayers):
for layer in range(1, numberOfLayers+1):
createLayerOfBlocks(layer, numberOfLayers)
# ----------------------------------
# Code specific to hexagons:
# -----------------------------------
def getHexPositionOnFlatSurface(ring, direction, position, radius):
sqrt3 = math.sqrt(3)
if direction == Direction.C:
return ( 0, 0)
elif direction == Direction.SW:
return ( -1.5 * position * radius, -sqrt3 * (ring-1) * radius + sqrt3 / 2 * position * radius)
elif direction == Direction.W:
return ( -1.5 * (ring - 1) * radius, -sqrt3 / 2 * (ring - 1 - 2 * position ))
elif direction == Direction.NW:
return ( -1.5 * (ring - 1 - position) * radius, sqrt3 / 2 * (ring - 1 + position ) * radius )
elif direction == Direction.NE:
return ( 1.5 * position * radius, sqrt3 * ( ring - 1 - position / 2 ) )
elif direction == Direction.E:
return ( 1.5 * (ring-1) * radius, sqrt3 / 2 * radius * ( ring - 1 - 2 * position))
else: # direction == Direction.SE
return ( 1.5 * radius * ( ring - 1 - position), - sqrt3 / 2 * radius * ( ring - 1 + position ))
def getHexPosition(layer, ring, direction, position, numberOfLayers, radius, thickness):
(x,y) = getHexPositionOnFlatSurface(ring, direction, position, radius)
z = thickness * (numberOfLayers - layer)
return (x,y,z)
def createHexTile(layer, ring, direction, position, numberOfLayers, radius, thickness):
(x,y,z) = getHexPosition(layer, ring, direction, position, numberOfLayers, radius, thickness)
hexName = "Hex_L" + str(layer) + "R" + str(ring) + DirToString(direction) + "_" + str(position)
blenderLayer = 10 + layer - ring + 1 # For bottom-up layering, use blenderLayer = 10 + layer
# Note: hexagons are in a separate set of layers from blocks
layerSelection = selectLayer(blenderLayer)
bpy.context.scene.layers[blenderLayer] = True # Otherwise bpy.context.object is not the newly added cube!
# Make it slightly smaller to create shadows between adjacent hexes of the same colour:
adjustedThickness = thickness * 0.995
adjustedRadius = radius * 0.995
bpy.ops.mesh.primitive_cylinder_add(vertices=6, radius=adjustedRadius, depth=adjustedThickness, end_fill_type='NGON', location=(x,y,z), rotation=(0,0,radians(30)), layers=layerSelection)
bpy.context.object.name = hexName
# Create a material for the new hex tile:
diffuseColor = getColorForBlockOrHex(layer, ring, direction, position)
matName = "Mat_" + hexName
mat = makeMaterial(name = matName, diffuse = diffuseColor, specular=(1,1,1), alpha=1)
setMaterial(bpy.context.object, mat)
def createLineInRingOfHexTiles(layer, ring, direction, numberOfLayers, radius, thickness):
if ring == 1:
createHexTile(layer, 1, Direction.C, 1, numberOfLayers, radius, thickness)
else:
for pos in range(1,ring):
createHexTile(layer, ring, direction, pos, numberOfLayers, radius, thickness)
def createRingOfHexTiles(layer, ring, numberOfLayers, radius, thickness):
if ring == 1:
createLineInRingOfHexTiles(layer, ring, Direction.C, numberOfLayers, radius, thickness)
else:
for dir in range(1,7):
createLineInRingOfHexTiles(layer, ring, dir, numberOfLayers, radius, thickness)
def createLayerOfHexTiles(layer, numberOfLayers, radius, thickness):
for ring in range(1,layer+1):
createRingOfHexTiles(layer, ring, numberOfLayers, radius, thickness)
def createHexPyramid(numberOfLayers, radius = 1, thickness = 1):
for layer in range(1, numberOfLayers+1):
createLayerOfHexTiles(layer, numberOfLayers, radius, thickness)
# --------------------------------
# Generate cubes and hex pyramids:
# --------------------------------
# Use any number of layers up to 7.
# More than that and hexes/blocks will be placed in camera layers,
# making deleting more difficult...
createCube(4)
createHexPyramid(4)
# -------------------------------------------------------------
# Sample code to generate cubes and hex pyramids incrementally:
# -------------------------------------------------------------
# You can build up the cube incrementally e.g.
# createLineInRingOfBlocks(4, 4, Direction.SW, 4)
# createLineInRingOfHexTiles(4, 4, Direction.SW, 4, radius=1, thickness=1)
#
# createRingOfBlocks(4, 4, 4)
# createRingOfHexTiles(4, 4, 4, radius=1, thickness=1)
Anyway, that's it. Enjoy!
Sunday, November 11, 2012
Why a pyramid of hexagons is cubic
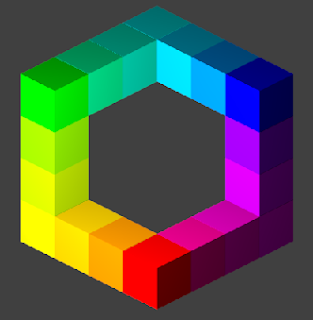
Below is a "pyramid" made out of hexagonal blocks:
Surprisingly, such a structure always contains a cubic number of hexagonal tiles (aka hexes). The structure above is 4 high and contains 4 x 4 x 4 = 64 hexes.
In a previous blog post, I gave an algebraic proof of why this must be so. Now I present a visual demonstration to help you really understand why!
In a way, what I'm trying to show is this...
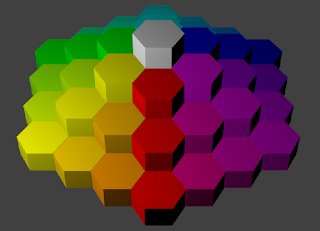
Let's look at the pyramid of hexagons from almost directly above. See how each hex has an equivalent block in the cube...
But what about the hidden pieces in the pyramid and cube - do they also correspond directly?
Yes, they do. The visible pieces of each structure form a "shell" over that structure. Remove these shells and you are left with a smaller pyramid and cube. The outer shells of these smaller structures map across in exactly the same way. Keep on peeling away the layers and you see that every hex tile maps to a unique block in the cube and vice versa.
I set up a spreadsheet to show how this nesting works...
And that, my friends, is how beautiful Mathematics can be!
Thursday, November 08, 2012
Some hints for why the pyramid of hexagons is cubic
In my previous two posts I noted that a pyramid built of hexagonal boards contains a cubic number of hexagons and I provided an algebraic proof of this.
My goal is to provide a visual explanation of why this is so.
For those who would like to tackle this challenge themselves, here are a few visual hints...
Is the following shape a hexagon?
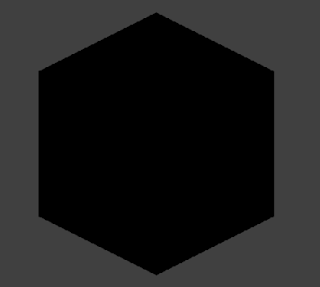
Or the silhouette of a cube?

Or the silhouette of the base and two adjacent sides of the same cube?


My goal is to provide a visual explanation of why this is so.
For those who would like to tackle this challenge themselves, here are a few visual hints...
Is the following shape a hexagon?

Or the silhouette of a cube?

Or the silhouette of the base and two adjacent sides of the same cube?

It's also possible to view this last figure from below, like this:

Looking from below makes it easier to see the cornerstone and edge pieces which aren't visible in the previous figure. So you can count the blocks more easily.
At this point you might want to count the number of blocks adjacent to the white cornerstone (including diagonally). And the number of blocks 2 steps away. And the number of blocks 3 steps away.
Are you seeing a pattern yet?
Saturday, November 03, 2012
Proof that a pyramid of hexagons contains a cubic number of tiles
In my previous blog post I observed that there are a cubic number of hexagons in a pyramid of hexagonal boards (such as found in the game Take It Easy).
My main aim is to provide a visual explanation of why this is so. But first I would like to prove the result algebraically...
The first few equations are reminders of some well-known mathematical results which we will need.
If f is a function defined on the numbers 0, 1, ... n, then
$$ \sum_{{i}={1}}^{n}[f(i)-f(i-1)] = f(n)-f(0) \tag{1}$$
This is true because if you expand out the summation, all the terms except f(n) and f(0) cancel out:
$$ [f(n)-f(n-1)] + [f(n-1)-f(n-2)]+...+[f(2)-f(1)] + [f(1)-f(0)] $$
Recall the formula for the triangular number series: $$ \sum_{{i}={1}}^{n}i= \frac{n \cdot \left(n+1\right)}{2} \tag{2} $$
[You can easily prove this using equation 1. Just set $ f(i) = \frac{i(i+1)}{2} $. Then $ f(i) - f(i-1) = i $ .]
Expand: $$ (n-1)^{3} = n^{3} -3n^{2} + 3n - 1 $$ Then rearrange the terms to give: $$ n^{3} - (n-1)^{3} = 3n^{2}- 3n + 1 \tag{3} $$
A hexagonal board can be seen as concentric rings of hexagonal tiles. Ring 1, the innermost "ring", simply contains the single hexagon at the centre of the board. Ring 2, just outside it, contains 6 hexagons. Ring 3 contains 12. Ring 4 contains 18, and so forth.
So the number of hexagons in ring k is:
$$ r(k)=\begin{cases} 1& \text{if k = 1,}\\ 6(k-1)& \text{if k > 1} \end{cases} $$
Hence the number of hexagons in all the rings from 1 to k is:
$$ \begin{align*} h(k) &= \sum_{{i}={1}}^{k}r(i) \\ &= r\left(1\right) + \sum_{{i}={2}}^{k}[6(i-1)] \\ &= 1 + 6 \cdot \sum_{{i}={1}}^{k-1}i & \text{by re-indexing the summation} \\ &= 1 + 6 \cdot \frac{ \left(k-1\right) \cdot k }{2} & \text{by equation (2)} \\ &= 1 + 3k^{2} - 3k \\ &= 3k^{2} - 3k + 1 \tag{4} \end{align*} $$
Let $ f(k) = k^{3} $
Then:
$$ \begin{align*} f(k) - f(k-1) &= k^{3} - (k-1)^{3} \\ &= 3k^{2} - 3k + 1 & \text{by equation (3) } \\ &= h(k) & \text{by equation (4) } \end{align*} $$ Hence: $$ h(k) = f(k) - f(k-1) \tag{5} $$
So the number of hexagonal tiles in a hexagonal pyramid with n layers is:
$$ \begin{align*} p(n) &= \sum_{{k}={1}}^{n}h(k) \\ &= \sum_{{k}={1}}^{n}[f(k) - f(k-1)] & \text{by equation (5)} \\ &= f(n) - f(0) & \text{by equation (1)} \\ &= n^{3} - 0^{3} \\ &= n^{3} \end{align*} $$
Q.E.D.
An observation - a pyramid of hexagons contains a cubic number of tiles
Some months back I was contemplating the board game Take It Easy. And I noticed something very interesting.

First some background... In Take It Easy, each player has a hexagonal board which looks like this:

The aim of the game is to place hexagonal tiles on the board so as to make as many complete lines of a single colour as possible. Each player has their own board and a set of 27 tiles. And the game basically plays like Bingo for statisticians.
Note that 27 is a cubic number (3 to the power of 3). This is because there are 3 different numbers in each of the 3 possible directions.
While looking at the board I realised that you could stack the 27 tiles to form a pyramid of hexagonal boards. It turned out that this was a general pattern...
The simplest pyramid of hexagons has a single hexagon, and 1 = 1 x 1 x 1.
With two layers of hexagons, you have a single hexagon on the top layer, and 1 + 6 hexagons on the second layer. Lo and behold, 1 + (1 + 6) = 8 = 2 x 2 x 2.
The third layer has 1 in the top layer, 1 + 6 in the middle layer and 1 + 6 + 12 = 19 in the bottom layer. 1 + (1 + 6) + (1 + 6 + 12) = 27 = 3 x 3 x 3.
The fourth layer has:
1 + ( 1 + 6) + (1 + 6 + 12 ) + (1 + 6 + 12 + 18) = 1 + 7 + 19 + 37 = 64 = 4 x 4 x 4.
I was pretty sure it would be easy to prove this relationship algebraically. Now algebraic proofs are great for proving that something must be true. But they often aren't great for providing insight into WHY something is true. So I set myself a much more challenging goal - find a visual representation of a cube which will show why this relationship is true.
I then forgot about the problem for 3 or 4 months. A week or two back I started thinking about the problem again. And 3 evenings later I had discovered a really beautiful visual explanation of this relationship. I hope to share that with you in the next few blog posts.
Disclosure
I've included links to Take It Easy, Take It To The Limit and the digital version of Take It Easy on Amazon.com. Please note that these are affiliate links and I could earn a small commission if you make a purchase through Amazon after clicking on one of these links.
Take It Easy is a game that is quick to play and rather addictive. It's a game I often break out at the start of a games evening while we wait for everyone to arrive. In fact I own 3 copies of this game, as this accommodates up to 12 players.
While I heartily recommend the board game, I haven't tried the digital version. I've included that link for your convenience only - a digital version is often a cheap way to decide whether a particular game is your cup of tea. But I am expressly not recommending it (nor am I recommending against it... I just don't know).
Friday, November 02, 2012
DLL Hell
I recently downloaded GNU Solfege ear training software. On trying to run it I encountered the dreaded message "The procedure entry point deflateSetHeader could not be located in the dynamic link library zlib1.dll."
So Solfege was presumably getting handed an outdated version of the dll to run, instead of the version installed in its bin folder. A typical DLL hell issue.
It's been years since I last recall fighting with DLL hell. So I guess that while .Net doesn't completely solve DLL hell, it has certainly mitigated the problem.
I first tried looking for the dll in c:\windows\system32. But there was no copy of zlib1 there.
I thought that the wrong DLL version might be somewhere on the environment PATH. So I then wrote the following Powershell script to search for the dll:
This script showed that one of the Roxio folders is in the path and contains a zlib1 dll from 2010. So I removed Roxio from the environment path. But still I got that error message.
[If I'd thought to first check what order Windows looks for dll's in, I could have saved myself the trouble. It looks like the PATH variable is the last place searched.]
So where could the culprit be?
I then opened up the Process Explorer utility from the brilliant SysInternals suite. One of my most-used features in Process Explorer is the "Find handle or dll" menu item (CTRL + F). This showed that zlib1.dll was in c:\windows\SysWOW64...

That version of zlib1.dll was ancient - last modified in 2007. So I backed it up and copied a much newer version across.
And now GNU Solfege is working again!
So Solfege was presumably getting handed an outdated version of the dll to run, instead of the version installed in its bin folder. A typical DLL hell issue.
It's been years since I last recall fighting with DLL hell. So I guess that while .Net doesn't completely solve DLL hell, it has certainly mitigated the problem.
I first tried looking for the dll in c:\windows\system32. But there was no copy of zlib1 there.
I thought that the wrong DLL version might be somewhere on the environment PATH. So I then wrote the following Powershell script to search for the dll:
$paths = ($env:path -split ';' | % { $_ -replace '%SystemRoot%','c:\windows' } )
Get-ChildItem -path $paths -filter 'zlib1.dll'
This script showed that one of the Roxio folders is in the path and contains a zlib1 dll from 2010. So I removed Roxio from the environment path. But still I got that error message.
[If I'd thought to first check what order Windows looks for dll's in, I could have saved myself the trouble. It looks like the PATH variable is the last place searched.]
So where could the culprit be?
I then opened up the Process Explorer utility from the brilliant SysInternals suite. One of my most-used features in Process Explorer is the "Find handle or dll" menu item (CTRL + F). This showed that zlib1.dll was in c:\windows\SysWOW64...

That version of zlib1.dll was ancient - last modified in 2007. So I backed it up and copied a much newer version across.
And now GNU Solfege is working again!
Subscribe to:
Posts (Atom)