I'm a South African software developer based in the technology hub of Kitchener-Waterloo, Ontario.
I enjoy solving mathematical and algorithmic puzzles. These are some of my thoughts...
More: An efficient algorithm for arbitrary intervals
Online research: In which I discover that it is called the Josephus problem
Introduction
In my previous blog entry I described a problem from the 2010 South African Mathematics Olympiad. In the next few posts I'm going to show you a few ways of solving the problem. But in this blog entry, I'm just going to set up the equations which the various solutions will all make use of.
Let's start with a recap of the problem...
Imagine n people sitting in a circle. Label them 1 to n in a clockwise direction. Imagine walking around the circle tapping every second person on the shoulder (person 2, 4, 6 and so on). People leave the circle when they are tapped. This continues until only one person is left. What is the label of that person?
Derivation
Firstly let's define f(n) to be the label of the last person remaining when there are n people in the circle.
Clearly f(1) = 1.
What we'd like to do is find expressions for f(n) in terms of f(m) where m is smaller than n.
Every second person is being asked to leave with roughly half as many people remaining after each walk around the circle. This suggests that we should consider the cases of n being odd and even separately.
So let's see what happens when there are an even number of people around the circle, say 2n people.
In our first trip around the circle, the n even numbered people will leave the circle. This will leave n odd-numbered people.
Let's re-label these odd people as 1, 2, ..., n. Then the (new) label of the last person remaining would equal f(n). That comes straight from the definition of f(n).
But we are interested in the original label of this last person. That is not f(n) but 2.f(n) - 1. This is because 2k - 1 is the kth odd number.
Hence f(2n) = 2 f(n) - 1.
Next we will find a similar formula for circles with an odd number of people.
We already have a formula for n = 1. All other positive odd numbers can be expressed as 2n+1 for some positive integer n.
Initially the situation looks like this for 2n+1 people:
We would like to express f(2n+1) in terms of f(n). That means still having n people in the circle after the first round of removals.
To do this we need to remove n+1 people. The first n people removed are all even numbered as before. But now the (n+1)th person removed is person number 1. This leaves the following arrangement:
Note that the kth person in the new circle of people has a label of 2k+1.
So we can re-label the remaining people from 1 to n as before, and f(n) is the new label of the last person remaining if we continue the elimination process. But in the original labelling scheme, this becomes 2.f(n) + 1.
So we have shown that f(2n+1) = 2.f(n) + 1.
The basic equations
If we put all of this together, we get the following set of equations (where n is a positive integer):
More: An efficient algorithm for arbitrary intervals
Online research: In which I discover that it is called the Josephus problem
Introduction
Some months back I discovered the web site of the SA Math Foundation including past papers for the South African Mathematics Olympiad. Back in high school I used to love solving Mathematics problems. So I downloaded a bunch of question papers and starting solving some of them.
This series of blog postings describes some interesting solutions I found to one of the problems.
[Edit: I've since discovered that it is known as the Josephus problem]
The problem statement
One of the first papers I glanced at was the 2010 senior paper, second round.
The first question described a situation in which there are 10 people in a circle, and every 2nd person is asked to leave the circle. This continues until only one person remains. If we number the people 1 to 10, and eliminate person 2 then 4 and so on, what is the number of the last person left?
So it works much like the children's game "One potato, two potato", except that every 2nd person is eliminated, not every 8th person.
The plan
Later I was thinking back to the problem and made a fortuitous mistake. I accidentally thought that the problem was phrased as 2010 people, not 10 people (Math Olympiad problems often use the current year in the problem statement).
So I ended up solving the problem generally, not just for the number 10 (which can easily be solved by brute force).
In the next few blog postings I intend to show you a few solutions to the problem. As I did with the Pyramid of Hexagons problem, I want to provide an algebraic proof as well as intuitive insight into why the proof is true.
So my plan is as follows:
First I will generate the basic equations which all the solutions will use
Thereafter I will provide my first algebraic solution
Then I will try to give some insight into an interesting pattern behind the formula Hint: There is a link to the binary number system.
Then I will give a simpler proof inspired by this pattern.
And finally I will provide the code I wrote to generate the illustrations.
Disclaimer
While the visualization should be very helpful, it's not going to be as striking as my Pyramid of Hexagons visualization.
So I'm hoping that a reader of this blog will be able to find an even more elegant way of explaining the formula.
We recently had an issue at work where CPU utilizations on our app servers started "flat-lining" at 100%. This starved our WCF service hosts of CPU cycles, leading to complaints of slow performance.
The performance decline was dramatic and it didn't occur straight after a release. This suggested that something had changed elsewhere in the organisation.
The approach on our project has been to regularly release new modules side-by-side with the legacy system. Integration messages keep the data in the two systems synchronized. This significantly minimizes risk compared to a "big bang" approach.
But some users continue using the old system surreptitiously. Printing is a case in point. Print driver issues had been a frequent source of problems in the past. So some users had gone back to using the old system for printing.
Unbeknownst to us, the legacy team had removed the ability to print documents through the legacy system. So the printing load had suddenly increased by 50%.
This led to other problems in the system. For example, our performance logging queue started building up on one of the app servers. Messages are inserted in parallel, but the logging service is throttled to only process one message at a time. So when the logging service is starved of CPU cycles, it starts falling behind. This leads to a constant drain on CPU, making further "flat-lining" more likely.
We had been aware for some time that printing could cause performance problems. So fortunately I already had a design in place for moving most of the printing load onto the print servers, where CPU was under-utilized. But it would take a week or two to develop and test the code.
As an interim solution we commissioned a few more app servers.
To check whether printing was the sole source of problems, I took some random snapshots of resource monitor graphs on one of the application servers. At times printing was clearly causing the CPU to flatline at 100%. But at other times the app servers flatlined when no printing was taking place. So I suspected that printing was not the only cause of high CPU usage. Instead of app servers being able to recover from short-lived "distress states", the extra printing load had caused performance to reach a runaway situation.
To quantify this, I wrote a Powershell script to use WMI to sample CPU utilization for each process on each app server. I wrote the results to a csv file, opened it in Excel, and generated a pivot table off the data.
This highlighted some other issues that we hadn't been aware of before. For example, there was an SNMP monitoring process, SysEdge, which was consuming 25% CPU on 3 of the app servers for long periods each morning. I alerted the infrastructure team and they were able to fix this issue so that SysEdge was consuming under 1% CPU on all app servers.
param (
    [string[]] $serverNames = $( throw 'The list of server names was not provided' ),
    [int] $coresPerServer = $( throw 'The number of cores per server was not provided' ),
    [int] $repetitions = 1,
    [int] $intervalInSeconds = 60
)

1..$repetitions | foreach-object {
    $repetition = $_
    [DateTime] $now = [DateTime]::Now
    Write-Host "Getting CPU utilizations at $now (repetition $repetition)" -foregroundColor Green

    foreach ($server in $serverNames)
    {
        Write-Host "    Getting processes on $server" -foregroundColor Cyan

        $prc = gwmi Win32_PerfFormattedData_PerfProc_Process -computerName $server  # To get around bug where it is zero the first time called
        $prc = gwmi Win32_PerfFormattedData_PerfProc_Process -computerName $server | ? { $_.Name -ne '_Total' -and $_.Name -ne 'Idle' }
        $recordedAt = [DateTime]::Now

        $summary = $prc | select-object IDProcess,Name,PercentProcessorTime,WorkingSet,@{n='PercentTime';e={$_.PercentProcessorTime/$coresPerServer}}

        foreach ($processSummary in $summary)
        {
            $processName = $processSummary.Name
            $processName = ($processName.Split('#'))[0]
            $percentTime = $processSummary.PercentTime
            $workingSet = $processSummary.WorkingSet

            $record = new-object -typeName 'PSObject' -property @{
                Server = $server
                Process = $processName
                Repetition = $repetition
                AvgCPU = [Math]::Round( $percentTime, 2 )
                WorkingSet = $workingSet
                RecordedAt = $recordedAt
                Year = $recordedAt.Year
                Month = $recordedAt.Month
                Day = $recordedAt.Day
                DayOfWeek = $recordedAt.DayOfWeek
                Hour = $recordedAt.Hour
                Minute = $recordedAt.Minute
            }
            $record
        }
    }

    $timeTillNextRepetition = $now.AddSeconds($intervalInSeconds) - [DateTime]::Now
    $secondsToWait = $timeTillNextRepetition.TotalSeconds
    if ($secondsToWait -gt 0)
    {
        Start-Sleep -Seconds $secondsToWait
    }
}
A few notes on the Powershell script...
You will notice that I make the WMI call twice. This is because the first call for a particular app server will return all zeroes. I suspect the first call for each app server could be moved outside the loop (e.g. have a loop zero whose data is discarded). But it was good enough for my purposes.
I also kept the following piece of code to illustrate a point...
I used to write code like this a lot, assigning the $_ iteration variable to another variable. This was for 2 reasons...
Firstly, for debugging purposes. I would assign the variable a value to test. Then copy the remainder of the inner script block into the Powershell REPL.
And secondly, so that I could nest loops but still access the outer iteration variable.
However there is an easier way to get the same effect...
foreach ($repetion in 1..$repetitions) {
    ...
}
We have since gone live with the new printing solution. And so far things are looking very promising. CPU load has only decreased slightly, but its "spikiness" seems to have improved significantly. Average execution times of service calls appear to have decreased by up to 18% at the busiest time of day. And it certainly looks like the print processes are terminating faster than before, presumably because print spooling is now taking place locally.
This is also the first time that we have moved an asynchronous process to a different server, thus improving the performance of the synchronous processes which affect user perception of speed. I can see a lot of opportunity for doing more of this in future.
For the past couple of years I've been involved in a long-running project to replace many of the software applications for a large hospital network. For much of that time I've been the team lead for the production support team (although more recently my role has changed to being the team's designer, using Enterprise Architect to create UML diagrams for various enhancements to deployed modules).
Over that time I've spent a lot of time troubleshooting and fixing performance issues. This has ranged from identifying and fixing problems caused by database blocking, hunting down memory leaks with windbg and sosex and investigating the causes of high CPU utilization on app servers.
My approach invariably starts with finding a way to gather the right data to allow me to pinpoint where the problem lies.
Even in a high pressure severity 1 outage, this is still my most common starting point. The data allows me to cut out a whole lot of areas of the system for further investigation. With just a few areas to look at in detail, I can then delegate in-depth troubleshooting across team members.
In a crisis, the last thing you must do is panic and take a shotgun approach to looking for problems. First make sure you understand the problem. Data is a very objective way of doing this. But you can't do that unless you have data readily at hand and a toolkit of scripts and habits for rapidly gathering and analyzing that data.
The general purpose tools that I keep on using are Powershell and Excel pivot tables.
These are complemented by specific sources of data for each layer of the application, such as:
Various SQL DM views and query plans for understanding SQL performance problems
Our performance logs (saved to the database) for analyzing WCF service call durations
WMI for app server and print server performance
Memory dumps for memory leak issues at the client
In addition to this, there are some other tools that are very useful for getting a gut feel for a problem, such as SCOM (Systems Center Operations Manager) and Windows Resource Monitor.
SCOM graphs are great for getting a high level view of what's happening across a range of servers.
Resource Monitor is very useful for seeing what's happening on your servers at a point in time. The Process Explorer utility from the sysinternals suite is more powerful (we have it installed on all our app servers). But I've found that Resource Monitor is usually good enough for my purposes.
Interestingly enough, I haven't yet needed to use a code profiler, though this is probably the tool most developers think of first when you mention performance troubleshooting.
Even when the problem is with the code, there are usually other ways of pinpointing which code is at fault.
For example, one of the developers wrote code to hook into the NHibernate layer and write a debug message whenever a possible N+1 selects problem was detected. So those kind of problems can be picked up by the "new development" teams before they get deployed into the production environment.
We also have a Castle Dynamix Proxy interceptor which hooks into the web service proxy and logs performance data for every WCF service call made.
We have a monthly release cycle, and after each release we run a query against the performance logs to look for service calls which are performing significantly worse than a month earlier (this is the only reasonable baseline, since service call volumes differ significantly by day of the week and time of the month). So this also helps us to find poorly performing code without the need for a profiler.
Over the coming months I would like to share more details with you, including some of the Powershell and SQL scripts I've written to gather and analyze the data.
In my previous post I provided a visual explanation of why a pyramid of hexagons is cubic. I created the visuals for that post using Blender 2.64 and Python. For those interested in playing with the Blender model, I have uploaded it (with its embedded Python script) to this Google docs drive.
Bear in mind that this is my first foray into both Blender and Python. So it's unlikely to be "idiomatic" Python or an example of Blender best practices!
To reduce size, the model only contains various cameras and lights. These are contained in layers 0, 8, 9, 10, 18 and 19 as can be seen at the bottom of the 3D view:
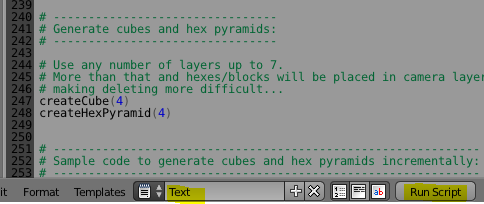
To create the blocks and hexagons you need to run the embedded script. First change from the "Default" layout to "Scripting" layout. Ensure the "Text" script is selected. And click on the "Run script" button.
Then change back to the default layout. You will see that layers 1 to 4 and 11 to 14 now show dots to indicate that they contain objects:
Layers 1 to 4 (the numbering starts at zero) in the top left block contain the various shells making up the cube. Layers 11 to 14 in the bottom left block contain the various layers making up the pyramid.
Since these two structures overlap, you shouldn't select both at the same time.
However when you want to start again, you should select just these 8 layers, hit A to toggle selection of all objects, and DELETE to delete the objects. Make sure you haven't selected any of the layers with cameras and lights, otherwise you will accidentally delete these too.
Use F12 to render the image as seen by the selected camera. But first you need to make sure that you have selected the layer that the camera and light are in, otherwise you will just see a silhouette.
Also make sure that the correct camera is selected for the scene...
The Python script allows you to generate an entire cube or Pyramid of a particular size using the following lines of code at the end of the script:
createCube(4)
createHexPyramid(4)
However you can also generate just part of the structure. This gives more insight into how the cube can be constructed from the cornerstone outwards. For example, the following code generates the outermost ring of the outermost shell in a 4x4x4 cube:
createRingOfBlocks(4, 4, 4)
And here is the code that does the same for the pyramid:
I calculated the South-Western line of blocks to start from the orange block going to the yellow block (in fact, originally the orange block was coloured red). My thinking was to label each line from 0 to n-1, but ignore hex zero (since it is also hex n-1 of the previous line). It turned out that wasn't the best idea as far as hex colours go.
Instead of re-calculating the formulae for all the hexagons, I took a short-cut and simply remapped the colour of each hexagon as if it was the hexagon following it (in clockwise order)...
def getColorForBlockOrHex(layer, ring, direction, position):
    # There is a better colour scheme than the one I chose.
    # Luckily it is easy to change to it.
    # Each hex/block uses the colour that the hex after it would have been assigned.
    (direction, position) = getDirAndPosOfNextClockwiseBlockOrHex( direction, position, ring)
    startColor = getStartColorForDirection(direction)
    if ring == 1 or ring == 2:
        (r, g, b) = startColor
    else:
        nextDir = getNextDir(direction)
        endColor = getStartColorForDirection(nextDir)
        (r1, g1, b1) = startColor
        (r2, g2, b2) = endColor
        ratio1 = (ring - position)/(ring-1)
        ratio2 = (position - 1)/(ring-1)
        r = ratio1 * r1 + ratio2 * r2
        g = ratio1 * g1 + ratio2 * g2
        b = ratio1 * b1 + ratio2 * b2
    return (r,g,b)
Here is the full Python script:
import bpy
import math

from math import *

# From http://blenderscripting.blogspot.com/2011/05/blender-25-python-selecting-layer.html:
def selectLayer(layer):
    return tuple(i == layer for i in range(0, 20))

# From http://wiki.blender.org/index.php/Dev:2.5/Py/Scripts/Cookbook/Code_snippets/Materials_and_textures:
def makeMaterial(name, diffuse, specular, alpha):
    mat = bpy.data.materials.new(name)
    mat.diffuse_color = diffuse
    mat.diffuse_shader = 'LAMBERT'
    mat.diffuse_intensity = 1.0
    mat.specular_color = specular
    mat.specular_shader = 'COOKTORR'
    mat.specular_intensity = 0.5
    mat.alpha = alpha
    mat.ambient = 1
    return mat

def setMaterial(ob, mat):
    me = ob.data
    me.materials.append(mat)

# ************************************************
# Following code by Andrew Tweddle, November 2012:
# ************************************************

# -----------------------------------
# Code common to blocks and hexagons:
# -----------------------------------

class Direction:
    C = 0
    SW = 1
    W = 2
    NW = 3
    NE = 4
    E = 5
    SE = 6

def DirToString(direction):
    if direction == Direction.C:
        return "C"
    elif direction == Direction.SW:
        return "SW"
    elif direction == Direction.W:
        return "W"
    elif direction == Direction.NW:
        return "NW"
    elif direction == Direction.NE:
        return "NE"
    elif direction == Direction.E:
        return "E"
    else:
        return "SE"


def getNextDir(direction):
    if direction == Direction.C:
        return Direction.C
    elif direction == Direction.SE:
        return Direction.SW
    else:
        return direction + 1

def getDirAndPosOfNextClockwiseBlockOrHex(direction, position, ring):
    if direction == Direction.C:
        return (direction, position)
    if position == ring - 1:
        newDir = getNextDir(direction)
        return (newDir, 1)
    return (direction, position + 1)

def getStartColorForDirection(direction):
    if direction == Direction.C:
        return (1,1,1)  # White
    elif direction == Direction.SW:
        return (1, 0, 0)  # Red
    elif direction == Direction.W:
        return (1, 1, 0)  # Yellow
    elif direction == Direction.NW:
        return (0, 1, 0)  # Green
    elif direction == Direction.NE:
        return (0, 1, 1) # Cyan
    elif direction == Direction.E:
        return (0, 0, 1)  # Blue
    else:  # direction == Direction.SE
        return (1, 0, 1)  # Magenta

def getColorForBlockOrHex(layer, ring, direction, position):
    # There is a better colour scheme than the one I chose.
    # Luckily it is easy to change to it.
    # Each hex/block uses the colour that the hex after it would have been assigned.
    (direction, position) = getDirAndPosOfNextClockwiseBlockOrHex( direction, position, ring)
    startColor = getStartColorForDirection(direction)
    if ring == 1 or ring == 2:
        (r, g, b) = startColor
    else:
        nextDir = getNextDir(direction)
        endColor = getStartColorForDirection(nextDir)
        (r1, g1, b1) = startColor
        (r2, g2, b2) = endColor
        ratio1 = (ring - position)/(ring-1)
        ratio2 = (position - 1)/(ring-1)
        r = ratio1 * r1 + ratio2 * r2
        g = ratio1 * g1 + ratio2 * g2
        b = ratio1 * b1 + ratio2 * b2
    return (r,g,b)


# ----------------------------------
# Code specific to blocks and cubes:
# -----------------------------------

def getBlockPositionInLastLayer(ring, direction, position):
    if direction == Direction.C:
        return (0,0,0)
    elif direction == Direction.SW:
        return (ring-1, ring-position-1,0)
    elif direction == Direction.W:
        return (ring-1, 0,position)
    elif direction == Direction.NW:
        return (ring-position-1, 0, ring-1)
    elif direction == Direction.NE:
        return (0, position,ring-1)
    elif direction == Direction.E:
        return (0, ring-1, ring-position-1)
    else:  # direction == Direction.SE
        return (position, ring-1, 0)

def createBlock(layer, ring, direction, position, numberOfLayers):
    (x,y,z) = getBlockPositionInLastLayer(ring, direction, position)
    if layer < numberOfLayers:
        offset = numberOfLayers-layer
        (x,y,z) = (x+offset,y+offset,z+offset)
    blockName = "Block_L" + str(layer) + "R" + str(ring) + DirToString(direction) + "_" + str(position)
    blenderLayer = layer - ring + 1  # For bottom-up layering use: blenderLayer = layer
    layerSelection = selectLayer(blenderLayer)
    bpy.context.scene.layers[blenderLayer] = True  # Otherwise bpy.context.object is not the newly added cube!
    bpy.ops.mesh.primitive_cube_add(location=(x, y, z), layers=layerSelection)
    bpy.context.object.name = blockName
    bpy.context.object.dimensions = (0.995,0.995,0.995)
    # Note: Made it slightly smaller to create shadows between adjacent blocks of the same colour
    #
    # Create a material for the new block:
    diffuseColor = getColorForBlockOrHex(layer, ring, direction, position)
    matName = "Mat_" + blockName
    mat = makeMaterial(name = matName, diffuse = diffuseColor, specular=(1,1,1), alpha=1)
    setMaterial(bpy.context.object, mat)

def createLineInRingOfBlocks(layer, ring, direction, numberOfLayers):
    for pos in range(1,ring):
        createBlock(layer, ring, direction, pos, numberOfLayers)

def createRingOfBlocks(layer, ring, numberOfLayers):
    if ring == 1:
        createBlock(layer, 1, Direction.C, 1, numberOfLayers)
    else:
        for dir in range(1,7):
            createLineInRingOfBlocks(layer, ring, dir, numberOfLayers)

def createLayerOfBlocks(layer, numberOfLayers):
    for ring in range(1,layer+1):
        createRingOfBlocks(layer, ring, numberOfLayers)

def createCube(numberOfLayers):
    for layer in range(1, numberOfLayers+1):
        createLayerOfBlocks(layer, numberOfLayers)


# ----------------------------------
# Code specific to hexagons:
# -----------------------------------
def getHexPositionOnFlatSurface(ring, direction, position, radius):
    sqrt3 = math.sqrt(3)
    if direction == Direction.C:
        return ( 0, 0)
    elif direction == Direction.SW:
        return ( -1.5 * position * radius, -sqrt3 * (ring-1) * radius + sqrt3 / 2 * position * radius)
    elif direction == Direction.W:
        return ( -1.5 * (ring - 1) * radius, -sqrt3 / 2 * (ring - 1 - 2 * position ))
    elif direction == Direction.NW:
        return ( -1.5 * (ring - 1 - position) * radius, sqrt3 / 2 * (ring - 1 + position ) * radius )
    elif direction == Direction.NE:
        return ( 1.5 * position * radius, sqrt3 * ( ring - 1 - position / 2 ) )
    elif direction == Direction.E:
        return ( 1.5 * (ring-1) * radius, sqrt3 / 2 * radius * ( ring - 1 - 2 * position))
    else:  # direction == Direction.SE
        return ( 1.5 * radius * ( ring - 1 - position), - sqrt3 / 2 * radius  * ( ring - 1 + position ))

def getHexPosition(layer, ring, direction, position, numberOfLayers, radius, thickness):
    (x,y) = getHexPositionOnFlatSurface(ring, direction, position, radius)
    z = thickness * (numberOfLayers - layer)
    return (x,y,z)

def createHexTile(layer, ring, direction, position, numberOfLayers, radius, thickness):
    (x,y,z) = getHexPosition(layer, ring, direction, position, numberOfLayers, radius, thickness)
    hexName = "Hex_L" + str(layer) + "R" + str(ring) + DirToString(direction) + "_" + str(position)
    blenderLayer = 10 + layer - ring + 1  # For bottom-up layering, use blenderLayer = 10 + layer
    # Note: hexagons are in a separate set of layers from blocks
    layerSelection = selectLayer(blenderLayer)
    bpy.context.scene.layers[blenderLayer] = True  # Otherwise bpy.context.object is not the newly added cube!
    # Make it slightly smaller to create shadows between adjacent hexes of the same colour:
    adjustedThickness = thickness * 0.995
    adjustedRadius = radius * 0.995
    bpy.ops.mesh.primitive_cylinder_add(vertices=6, radius=adjustedRadius, depth=adjustedThickness, end_fill_type='NGON', location=(x,y,z), rotation=(0,0,radians(30)), layers=layerSelection)
    bpy.context.object.name = hexName
    # Create a material for the new hex tile:
    diffuseColor = getColorForBlockOrHex(layer, ring, direction, position)
    matName = "Mat_" + hexName
    mat = makeMaterial(name = matName, diffuse = diffuseColor, specular=(1,1,1), alpha=1)
    setMaterial(bpy.context.object, mat)

def createLineInRingOfHexTiles(layer, ring, direction, numberOfLayers, radius, thickness):
    if ring == 1:
        createHexTile(layer, 1, Direction.C, 1, numberOfLayers, radius, thickness)
    else:
        for pos in range(1,ring):
            createHexTile(layer, ring, direction, pos, numberOfLayers, radius, thickness)

def createRingOfHexTiles(layer, ring, numberOfLayers, radius, thickness):
    if ring == 1:
        createLineInRingOfHexTiles(layer, ring, Direction.C, numberOfLayers, radius, thickness)
    else:
        for dir in range(1,7):
            createLineInRingOfHexTiles(layer, ring, dir, numberOfLayers, radius, thickness)

def createLayerOfHexTiles(layer, numberOfLayers, radius, thickness):
    for ring in range(1,layer+1):
        createRingOfHexTiles(layer, ring, numberOfLayers, radius, thickness)

def createHexPyramid(numberOfLayers, radius = 1, thickness = 1):
    for layer in range(1, numberOfLayers+1):
        createLayerOfHexTiles(layer, numberOfLayers, radius, thickness)


# --------------------------------
# Generate cubes and hex pyramids:
# --------------------------------

# Use any number of layers up to 7.
# More than that and hexes/blocks will be placed in camera layers,
# making deleting more difficult...
createCube(4)
createHexPyramid(4)


# -------------------------------------------------------------
# Sample code to generate cubes and hex pyramids incrementally:
# -------------------------------------------------------------

# You can build up the cube incrementally e.g.
# createLineInRingOfBlocks(4, 4, Direction.SW, 4)
# createLineInRingOfHexTiles(4, 4, Direction.SW, 4, radius=1, thickness=1)
#
# createRingOfBlocks(4, 4, 4)
# createRingOfHexTiles(4, 4, 4, radius=1, thickness=1)
Below is a "pyramid" made out of hexagonal blocks:
Surprisingly, such a structure always contains a cubic number of hexagonal tiles (aka hexes). The structure above is 4 high and contains 4 x 4 x 4 = 64 hexes.
Let's look at the pyramid of hexagons from almost directly above. See how each hex has an equivalent block in the cube...
But what about the hidden pieces in the pyramid and cube - do they also correspond directly?
Yes, they do. The visible pieces of each structure form a "shell" over that structure. Remove these shells and you are left with a smaller pyramid and cube. The outer shells of these smaller structures map across in exactly the same way. Keep on peeling away the layers and you see that every hex tile maps to a unique block in the cube and vice versa.
I set up a spreadsheet to show how this nesting works...
And that, my friends, is how beautiful Mathematics can be!
My goal is to provide a visual explanation of why this is so.
For those who would like to tackle this challenge themselves, here are a few visual hints...
Is the following shape a hexagon?
Or the silhouette of a cube?
Or the silhouette of the base and two adjacent sides of the same cube?
It's also possible to view this last figure from below, like this:
Looking from below makes it easier to see the cornerstone and edge pieces which aren't visible in the previous figure. So you can count the blocks more easily.
At this point you might want to count the number of blocks adjacent to the white cornerstone (including diagonally). And the number of blocks 2 steps away. And the number of blocks 3 steps away.
In my previous blog post I observed that there are a cubic number of hexagons in a pyramid of hexagonal boards (such as found in the game Take It Easy).
My main aim is to provide a visual explanation of why this is so. But first I would like to prove the result algebraically...
The first few equations are reminders of some well-known mathematical results which we will need.
If f is a function defined on the numbers 0, 1, ... n, then
$$ \sum_{{i}={1}}^{n}[f(i)-f(i-1)] = f(n)-f(0) \tag{1}$$
This is true because if you expand out the summation, all the terms except f(n) and f(0) cancel out:
$$ [f(n)-f(n-1)] + [f(n-1)-f(n-2)]+...+[f(2)-f(1)] + [f(1)-f(0)] $$
Recall the formula for the triangular number series:
$$ \sum_{{i}={1}}^{n}i= \frac{n \cdot \left(n+1\right)}{2} \tag{2} $$
[You can easily prove this using equation 1. Just set $ f(i) = \frac{i(i+1)}{2} $. Then $ f(i) - f(i-1) = i $ .]
Expand:
$$ (n-1)^{3} = n^{3} -3n^{2} + 3n - 1 $$
Then rearrange the terms to give:
$$ n^{3} - (n-1)^{3} = 3n^{2}- 3n + 1 \tag{3} $$
A hexagonal board can be seen as concentric rings of hexagonal tiles. Ring 1, the innermost "ring", simply contains the single hexagon at the centre of the board. Ring 2, just outside it, contains 6 hexagons. Ring 3 contains 12. Ring 4 contains 18, and so forth.
So the number of hexagons in ring k is:
$$
r(k)=\begin{cases}
1& \text{if k = 1,}\\
6(k-1)& \text{if k > 1}
\end{cases}
$$
Hence the number of hexagons in all the rings from 1 to k is:
Some months back I was contemplating the board game Take It Easy. And I noticed something very interesting.
First some background... In Take It Easy, each player has a hexagonal board which looks like this:
The aim of the game is to place hexagonal tiles on the board so as to make as many complete lines of a single colour as possible.
Each player has their own board and a set of 27 tiles. And the game basically plays like Bingo for statisticians.
Note that 27 is a cubic number (3 to the power of 3). This is because there are 3 different numbers in each of the 3 possible directions.
While looking at the board I realised that you could stack the 27 tiles to form a pyramid of hexagonal boards. It turned out that this was a general pattern...
The simplest pyramid of hexagons has a single hexagon, and 1 = 1 x 1 x 1.
With two layers of hexagons, you have a single hexagon on the top layer, and 1 + 6 hexagons on the second layer. Lo and behold, 1 + (1 + 6) = 8 = 2 x 2 x 2.
The third layer has 1 in the top layer, 1 + 6 in the middle layer and 1 + 6 + 12 = 19 in the bottom layer. 1 + (1 + 6) + (1 + 6 + 12) = 27 = 3 x 3 x 3.
I was pretty sure it would be easy to prove this relationship algebraically. Now algebraic proofs are great for proving that something must be true. But they often aren't great for providing insight into WHY something is true. So I set myself a much more challenging goal - find a visual representation of a cube which will show why this relationship is true.
I then forgot about the problem for 3 or 4 months. A week or two back I started thinking about the problem again. And 3 evenings later I had discovered a really beautiful visual explanation of this relationship. I hope to share that with you in the next few blog posts.
Disclosure
I've included links to Take It Easy, Take It To The Limit and the digital version of Take It Easy on Amazon.com. Please note that these are affiliate links and I could earn a small commission if you make a purchase through Amazon after clicking on one of these links.
Take It Easy is a game that is quick to play and rather addictive. It's a game I often break out at the start of a games evening while we wait for everyone to arrive. In fact I own 3 copies of this game, as this accommodates up to 12 players.
While I heartily recommend the board game, I haven't tried the digital version. I've included that link for your convenience only - a digital version is often a cheap way to decide whether a particular game is your cup of tea. But I am expressly not recommending it (nor am I recommending against it... I just don't know).
I recently downloaded GNU Solfege ear training software. On trying to run it I encountered the dreaded message "The procedure entry point deflateSetHeader could not be located in the dynamic link library zlib1.dll."
So Solfege was presumably getting handed an outdated version of the dll to run, instead of the version installed in its bin folder. A typical DLL hell issue.
It's been years since I last recall fighting with DLL hell. So I guess that while .Net doesn't completely solve DLL hell, it has certainly mitigated the problem.
I first tried looking for the dll in c:\windows\system32. But there was no copy of zlib1 there.
I thought that the wrong DLL version might be somewhere on the environment PATH. So I then wrote the following Powershell script to search for the dll:
This script showed that one of the Roxio folders is in the path and contains a zlib1 dll from 2010. So I removed Roxio from the environment path. But still I got that error message.
[If I'd thought to first check what order Windows looks for dll's in, I could have saved myself the trouble. It looks like the PATH variable is the last place searched.]
So where could the culprit be?
I then opened up the Process Explorer utility from the brilliant SysInternals suite. One of my most-used features in Process Explorer is the "Find handle or dll" menu item (CTRL + F). This showed that zlib1.dll was in c:\windows\SysWOW64...
That version of zlib1.dll was ancient - last modified in 2007. So I backed it up and copied a much newer version across.